最近从该 https://www.lfd.uci.edu/~gohlke/pythonlibs/上下载不下来了东西,找了wordcloud包,但是双击依旧没反应,也不知道这个包安装的基础包是什么,就干脆瞎子摸象,按照传统方法自行安装,在dos命令下,输入 pip install wordcloud ,最终提示“ Microsoft Visual C++ 9.0 is required. Get it from http://aka.ms/vcpython27” 于是就从 http://aka.ms/vcpython27上下载了改包,安装后, 再次安装wordcloud可以了 ----科研笔记存储系统
Visual Insights: A Practical Guide to MakingSense of Data Introduction This textbookoffers a gentle introduction to the design of insightful visualizations. Itseamlessly blends theory and practice, giving readers both the theoreticalfoundation and the practical skills necessary to render data into insights. The firstchapter introduces a theoretical framework that covers temporal, geospatial,topical, and network data analyses and visualizations. It is followed bychapters that detail visualizations and workflows that aim to answer “when”(temporal data), “where” (geospatial data), “what” (topical data), and “withwhom” (trees and networks) questions. The design and deployment of interactiveonline visualizations is discussed. Each chapter has a hands-on part thatdemonstrates how plug-and-play macroscope tools can be used to run advanceddata mining and visualization algorithms. The final two chapters presentexemplary case studies and discuss future developments. The bookaccompanies the Information Visualization MOOC that attracted students,scholars, and practitioners from many fields of science and more than 100different countries. Quotes byExperts “In the world ofvisualization and information graphics, the bibliography about thematic mapsand statistical graphs is becoming abundant, little by little. However, studiesof how to design network diagrams and conceptual maps are rare, and usuallyavailable only through scientific publications. Katy Börner’s and DavidPolley’s book is the first serious attempt at offering a theoretical andpractical introduction to this discipline, aimed not just at specialists but atany reader, regardless of her or his background. I foresee that it’ll becomethe textbook of choice for many instructors.” —Alberto Cairo,Professor of the Professional Practice at the School of Communication of theUniversity of Miami and author of The Functional Art: an Introduction toInformation Graphics and Visualization “A goodvisualization is never easy-beesy done; good visualization is a science, acraft, and an art at once. If you want to become a visual data explorer andlearn to produce meaningful visualizations, this book is a good guide for sucha journey. It is a must-read for students at iSchools and those in the DigitalHumanities, and a recommendation for inhabitants of the variousinterdisciplinary valleys in the science landscape.” —AndreaScharnhorst, Head of Research at Data Archiving and Networked Services andmember of the e-humanities group at the Royal Netherlands Academy of Arts andSciences in Amsterdam, Netherlands. “In this age ofknowledge abundance, policymakers and the public need to quickly understandcomplex information, and this book takes a giant leap forward in this arena.The knowledge system has become a global enterprise, and it is one thatinvolves collaboration and interdisciplinary linkages. These trans-boundarylinks require new metrics and the use of new methods of examination and explanation.Katy Börner’s and David Polley’s book creates a map into the new knowledgeterrain that we will all be transiting soon.” —Caroline S.Wagner, Milton and Roslyn Wolf Chair in International Affairs; Director,Battelle Center for Science Technology Policy, John Glenn School ofPublic Affairs, Ohio State University “Following inthe footsteps of the richly illustrated and highly informative book “The Atlasof Science: Visualizing What We Know”, Professor Katy Borner’s new book VisualInsights: A practical Guide to Making Sense of Data brings theory and practicein seven manageable chapters to both new initiate and engaged user, giving aninsightful overview of the field, and making accessible the methods andtechniques to empower the reader to become a visualization practitioner.” —George Legrady,Director of the Experimental Visualization Lab and Chair of the Media Arts Technology doctoral program at the University of California, SantaBarbara (以上内容:摘自:http://cns.iu.edu/ivmoocbook14.html) Product Details Paperback: 312 pages Publisher: The MIT Press (January 24, 2014) Language: English ISBN-10: 0262526190 ISBN-13: 978-0262526197 Product Dimensions: 9 x 7.5 x 0.6 inches Shipping Weight: 1.5 pounds ( View shipping rates and policies ) ( http://www.amazon.com/Visual-Insights-Practical-Guide-Making/dp/0262526190)
microsoft visual studio 2010 旗舰版的产品密钥 YCFHQ-9DWCY-DKV88-T2TMH-G7BHP 进入Visual Studio 开发环境点工具-导入和导出设置 选择 重置所有设置 然后关闭重新启动Visual Studio 会让你选择默认环境(就跟第一次启动Visual Studio 一样)
1、安装 安装后,按照要求,重新启动,总是弹出 Cannot find one or more components,。。。 从而无法启动。 重装了3次,问题竟然又没有了。不知什么原因。 这是遇到的第一个问题。 第二个问题,编译出错,提示缺少文件。使用Appwizard生成的程序编译连接也出错,解决方法见2: 另一个问题是,以上只是配置项目,如何将include 和lib一劳永逸设置?? 参考3、 为Visual Studio添加默认INCLUDE包含路径一劳永逸的方法(更新) 2、 fatal error C1083: 无法打开包括文件:“SDKDDKVer.h” http://www.global-webnet.com/Blog/post/2012/04/14/Kinect-SkeletalViewer-Cannot-open-include-file-SDKDDKVerh-No-such-file-or-directory.aspx The solution is 3 easy steps... While evaluating C++ development for the Kinect (for my http://SolrContrib.CodePlex.com project) I ran into issues compiling the newly installed project from the Sample (on a fresh install of Windows 8 and Visual Studio 2011). In the end I found that "the juice wasn't worth the squeeze"; the C# demos performed just as well as the C++ demos(in the same task that will meet my concerns) with a fraction of the coding (and learning curve). Binging a solution wasn't productive - I am a C# developer (with no understanding of the C++ environment) trying to compile a project under Windows 8 using Visual Studio 2011. I learned early thatwhen you liveon the bleeding edge that sometimes youhave to bleed, I was hemorrhaging. I did however find an excellent clue within the VS11: C++ include directories not set correctly in new project bug reported on the Microsoft site. There was enough information to let me know that I required a "Windows Kits" folder (WindowsSdkDir) which will hold the SDKDDKVer.h. Long story short the Bing trail took me to the following: Windows Driver Kit (WDK) 8 Consumer Preview: http://msdn.microsoft.com/en-us/windows/hardware/hh852362 Step #1 - Download and install this development kit,I wasn't trying to create Windows Drivers, however I felt it was safe to assume it would have everything Windows Drivers developers required to compile their C++ applications. The assumption paid off; afterI installed it, along withthe Windows Driver Frameworks (WDF) Co-Installers it will recommend that you install, the folders were now available! But I was still not compiling! I went back to bug report and like Jennifer I did not have the required "/shared" folder in the Include directories path (which she manually added). HOWEVER, I did note a checkbox setting inherit from parent or project defaults as I stumbled around trying to find "HOW"includes worked in thisenvironment(using the following steps): Step #2 - comply with the following steps Right click on SkeletalViewer Project Select Properties Open Configuration Properties (ref SkeletalViewer Property Pages in image below) Selected VC++ Directories (not shown in image) Select Include Directories (shown in image below) Click the dropdown box (down arrow icon) that will appear to right of input field Select Edit (you will see Include Directories windows shown in image below) Click the Macros button and scroll down to the WindowsSDK_Include path (shown below) I saw how the $(WindowsSDK_includePath), included with "Inherited values", contained my /Shared folder!!! I clicked the Checkbox Inherit from parent or project defaults, exited all windows applying updates as applicable. I Hit compile and I got another error - this time for a .lib file (can't recall what it was). 白冰做法:WDK是默认安装在C:\Program Files\Windows Kits中,具体将C:\Program Files (x86)\Windows Kits\8.0\Include - shared - um - winrt 三个目录包含到项目中。 这也可以直接通过在项目设置中添加引用这个$(WindowsSDK_includePath) 变量来实现,这个环境变量已经存在了,可以在宏中查到。 Step #3 - I followed the same steps from 5 on for the Library Directories path. 白冰做法:将C:\Program Files\Windows Kits\8.0\Lib\win7\km\x86 包含到 这个项目中。 这里也可以建立和引用环境变量的方式:可是如何在visual studio中为自己的工程添加环境变量?参见4 I Hit compile and Walla! I can compile and run the KinectViewer application! 3、 为Visual Studio添加默认INCLUDE包含路径一劳永逸的方法(更新) 你是否曾经也有过这样的问题: 用VS的时候,有时会用到一些非自带的库,例如WTL、Boost、DX等,每次需要用到时都要在项目属性里添加相应的include目录,久而久之觉得有点麻烦。是否有解决办法呢? 于是我便在网上找相关资料,在StackOverflow网站上找到一篇相关的文章( 原文链接 ),文章里提到的一个办法是修改 C:\Users\user\AppData\Local\Microsoft\MSBuild\v4.0\Microsoft.Cpp.Win32.user.props 这个文件,在这个文件里添加需要include的目录,之前我一直是用这个方法,也没啥问题。 当我安装了VS2012之后,问题变出现了。在VS2012上新建一个MFC的工程,什么也没动,居然编译不通过,提示找不到某些文件,我便联想到了是不是之前修改了影响到了,于是我果断把修改的那个文件恢复成默认的内容,再试,结果就没问题了。。。可是这样就得每次都手动添加WTL的目录了。。我便开始翻VS的一些配置文件。 解决方案一: 修改 " VS安装目录中的\VC\VCWizards\default.vcxproj " 这个文件,(这其实就是个xml文件) 如我的目录是" D:\Program Files\Microsoft Visual Studio 11.0\VC\VCWizards\default.vcxproj " 如果我要添加的目录是" D:\Program Files\Microsoft Visual Studio 11.0\VC\WTL\include "; 用文本编辑器打开这个文件,定位到文件末尾,在 /Project 之前插入如下内容 PropertyGroup IncludePath $(VCInstallDir)\WTL\include;$(IncludePath) / IncludePath / PropertyGroup $(VCInstallDir)\WTL\include; 就是需要添加的目录了。 $(VCInstallDir) 是VS里的环境变量(在我的电脑上就是" D:\Program Files\Microsoft Visual Studio 11.0\VC "),表示VC的安装目录。 $(IncludePath) 是表示原有的路径。实际上最终得到的路径如图里四个 如果需要添加lib文件的路径的话。格式就是 LibraryPath/LibraryPath 添加完后保存即可,新建一个项目后,在项目属性里可以看到目录已经加进去了。大功告成,VS2010也是用同样的方法,只不过目录不同了。 解决方案二: 这个方法是结合了开头提到的StackOverflow网站上的修改方法。 依然是修改 " VS安装目录中的\VC\VCWizards\default.vcxproj " 这个文件,只不过这里修改的地方不同,用文本编辑器打开该文件,查找" $(UserRootDir)\Microsoft.Cpp.$(Platform).user.props "这段内容, 其实这里就是指向了我电脑上的那个文件 C:\Users\HwangBae\AppData\Local\Microsoft\MSBuild\v4.0\Microsoft.Cpp.Win32.user.props ;这里我就想到了,为VS2010和VS2012指定不同的文件, 将" $(UserRootDir)\Microsoft.Cpp.$(Platform).user.props "全部替换成" $(UserRootDir)\ VC11\ Microsoft.Cpp.$(Platform).user.props "。 然后在 C:\Users\HwangBae\AppData\Local\Microsoft\MSBuild\v4.0 这个目录下创建了两个文件夹,分别命名为VC10和VC11,然后将 Microsoft.Cpp.Win32.user.props 复制到这两个文件夹,然后除了这两个文件夹外的文件均可删除,其他的文件VS会在那两个文件夹里自动重新创建的; 然后编辑 Microsoft.Cpp.Win32.user.props 这个文件,在 Project 节点下按照方法一的步骤插入同样的代码。在VS2010的目录下也做同样的替换。到此就完事了。测试无任何问题。 总结一下这两种方法的区别,方法一修改后,只对新建的项目有效,在没修改之前创建的项目是无效的,而方法对于之前创建的项目也有效。哪种方法比较适合大家自己取舍。 转载请标明出处,原文地址: http://www.cnblogs.com/hwangbae/archive/2012/06/24/2560463.html 如果觉得本文对您有帮助,请支持一下,您的支持是我写作最大的动力,谢谢。 4、 可是 如何在visual studio中为自己的工程添加环境变量 ? 右击"我的电脑"--选择"属性"---选择"高级"--选择"环境变量"--就可以新建自己的环境变量名了 如: 变量名:MicrosoftSDKDir 变量值:C:\ProgramFiles\MicrosoftSDKs\ 如果要设置目录 C:\ProgramFiles\MicrosoftSDKs\Windows\v6.0\Include 以后就可以在VC中设置目录的时候可以(设置default.vcxproj中的 LibraryPath/LibraryPath ) $(MicrosoftSDKDir)Include 了 5、 WTL for Visual Studio 2012 配置详解 学习WTL有一段时间了,因前段时间去参加国赛耽搁几周,回来之后便继续学习,一直对VS2012有爱的我便想在12上面写WTL,上WTL的SVN看到,已经添加了对VS11 beta的支持,其实11就是2012。。于是我便down下来。 网上搜集了一些WTL环境的配置的资料,都写得不错,我在这里做更详细的补充。 Step1: 从WTL的SVN上获取所需的文件,这里需要两份文件 WTL include文件 http://wtl.svn.sourceforge.net/viewvc/wtl/trunk/wtl/include/?view=tar WTL wizard文件 http://wtl.svn.sourceforge.net/viewvc/wtl/trunk/wtl/Wizards/AppWiz/?view=tar 上面提供的仅是Win32所需要的文件,如果需要WTL的其他资源或整个项目,请访问下面的链接 http://wtl.svn.sourceforge.net/viewvc/wtl/?view=tar (以上链接请直接在浏览器打开,勿使用迅雷之类的工具下载) 下载下来是tar.gz的压缩包 可以使用WinRar或者7z之类的软件解压,我这里用WinRar,解压出来后得到两个文件夹 AppWiz就是将WTL添加到VS创建向导里的一些文件,include就是WTL的头文件。 在AppWiz文件里,有一个Files文件夹和多个setupxx.js文件 这些js脚本文件可以帮你将向导文件添加到VS的目录里,不同版本的VS对应不同的js文件 ,例如VS2012就是setup110.js (带x表示Express版本),这里我为了方便管理,需要做出一些修改; 找到" VS安装目录\VC\VCWizards\AppWiz "这个目录,如我电脑上就是" D:\Program Files\Microsoft Visual Studio 11.0\VC\VCWizards\AppWiz ", 在这个目录下新建一个 WTL 文件夹,然后将 Files 文件夹和 setup110.js 移动到WTL文件夹下。 然后将 Files 文件夹重命名为 Application ,然后用记事本编辑 setup110.js ,定位到第60行。 将 var strSourceFolder = FileSys.BuildPath(strValue, "Files"); 修改成 var strSourceFolder = FileSys.BuildPath(strValue, "Application"); 然后打开cmd,执行如下代码 wscript //e :jscript "D:\Program Files\Microsoft Visual Studio 11.0\VC\VCWizards\AppWiz\WTL\setup110.js" 执行完会提示应用程序向导安装成功。 这里再说下另一种方法,先不将Files改为Application,js文件也不修改,直接在cmd里执行安装,安装完后,将Files修改为Application,然后找到 D:\Program Files\Microsoft Visual Studio 11.0\VC\vcprojects\WTLAppWiz.vsz 这个文件,用记事本打开该文件 将第六行 Param="ABSOLUTE_PATH = D:\Program Files\Microsoft Visual Studio 11.0\VC\VCWizards\AppWiz\WTL\Files" 改成 Param="ABSOLUTE_PATH = D:\Program Files\Microsoft Visual Studio 11.0\VC\VCWizards\AppWiz\WTL\Application" 其实吧,不改也是没啥影响,只不过我比较蛋疼。。。。 到这里就完成了向导的添加,如果有洁癖可以把js文件删除掉了。 Step2: 添加WTL的头文件,解压出来的include文件夹下有这些头文件 我的做法是在 D:\Program Files\Microsoft Visual Studio 11.0\VC 下创建了一个WTL文件夹,将include文件夹放进WTL。(也可以放其他目录,配置include目录时改下即可) include目录的添加请参考我的另一片文章 为Visual Studio添加默认INCLUDE包含路径一劳永逸的方法 http://www.cnblogs.com/hwangbae/archive/2012/06/24/2560463.html 由于VFC还未更新对VS2012的支持,我这里就不写VFC的配置了。 如果配置的过程中遇到了问题,欢迎在博客留言讨论或者Email我。 欢迎转载本文章,但请标明出处,原文地址: http://www.cnblogs.com/hwangbae/archive/2012/06/27/2565591.html 如果觉得本文对您有帮助,请支持一下,您的支持是我写作最大的动力,谢谢。 FAQ A: 在cmd里执行js脚本时出现错误: 没有文件扩展 “.js” 的脚本引擎。 怎么解决: Q: 打开注册表编辑器,定位到HKEY_CLASSES_ROOT\.js,将默认值改成JSFILE。
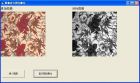
Visual Basic 与图像处理(三) 9 、 Laplacian 微分算子 前面讲的几种都是一阶微分算子,本节开始讲的是二阶微分算子,从理论上来说二阶微分算子比一阶微分算子更为敏感,因此能够提取到更多的细节信息。二阶微分算子中最常用也最简单的就是拉普拉斯( Laplacian )微分算子,可以用下面的公式进行表示: 上式也可以写成平时常见的模板形式: 本例的运行界面如下: Laplacian 滤波按钮对应的代码如下: Private Sub cmdLaplacianFilter_Click() Dim i As Integer, j As Integer Dim PixelValue As Long Dim r As Integer, g As Integer, b As Integer Dim GrayValue As Integer Dim Temp(2, 2) As Integer Dim x As Integer, y As Integer Dim Dx As Integer, Dy As Integer Dim NGrayValue As Integer ' 设置目标图像的高度和宽度 DestImHeight = SourceImHeight - 2 ' 边界像素直接不要了 DestImWidth = SourceImWidth - 2 ' 设置目标 PictureBox 的大小 PicDest.Height = DestImHeight PicDest.Width = DestImWidth ReDim dbits(DestImHeight - 1, DestImWidth - 1, 2) As Byte ' 重新定义目标数组的维数 dbits = sbits ' 数组的直接复制,只有数组维数完全一样才可以 ' 图像的 Laplacian 滤波 For i = 1 To SourceImHeight - 2 ' 边界像素不处理 For j = 1 To SourceImWidth - 2 NGrayValue = 0 For x = 0 To 2 For y = 0 To 2 r = sbits(i + 1 - x, j + 1 - y, 0) g = sbits(i + 1 - x, j + 1 - y, 1) b = sbits(i + 1 - x, j + 1 - y, 2) ' 插入图像处理的过程,对 r, g, b 进行处理 Temp(x, y) = 0.3 * r + 0.59 * g + 0.11 * b Next y Next x NGrayValue = Abs(4 * Temp(1, 1) - Temp(0, 1) - Temp(1, 0) - Temp(1, 2) - Temp(2, 1)) If NGrayValue 255 Then NGrayValue = 255 dbits(i - 1, j - 1, 0) = NGrayValue dbits(i - 1, j - 1, 1) = NGrayValue dbits(i - 1, j - 1, 2) = NGrayValue Next j Next i Dim tDBmpInfo As BITMAP Dim hDestBmp As Long hDestBmp = PicDest.Image.Handle ' 获得位图信息 Call GetObject(hDestBmp, Len(tDBmpInfo), tDBmpInfo) ReDim ImageArray(1 To DestImWidth * 4, 1 To DestImHeight) As Byte For i = 1 To DestImHeight For j = 1 To DestImWidth ImageArray((j - 1) * 4 + 1, i) = dbits(i - 1, j - 1, 2) ImageArray((j - 1) * 4 + 2, i) = dbits(i - 1, j - 1, 1) ImageArray((j - 1) * 4 + 3, i) = dbits(i - 1, j - 1, 0) Next j Next i ' 获得源图与目标图二进制位 Call SetBitmapBits(hDestBmp, tDBmpInfo.bmWidthBytes * tDBmpInfo.bmHeight, ImageArray(1, 1)) End Sub 拉普拉斯算子还有许多变形形式,这里给出几种常用的变式: 由于拉普拉斯是一种微分算子,它的作用强调图像中的灰度等级的突变,在实际应用中可以将锐化结果叠加到原始图像中,这样既可以保护拉普拉斯锐化处理的效果,同时也能复原原始背景信息,用运算模板的形式表示如下: 这是的运行界面如下: 对比原图可以看出,经过这种方法强化的图像中,细节信息更为明显,上述织物图像表面纹理要比原图清晰得多。
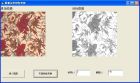
Visual Basic 与图像处理 ( 三 ) 6 、 Roberts 微分算子 前面介绍的两种微分算子,实际上是分别求出了水平和垂直方向上的细节信息。但在实际的图像处理之中,除了特殊用途之下才会使用到方向滤波,大部分二维图像处理时,需要同时获得两个方向上的细节信息,因此需要设计各向同性的微分算子用于图像的锐化处理。 Roberts 算子一种常用的微分算子,可以满足上述要求,其计算方法可以用下面的公式进行表示: 同样上面的公式可以用下面的两个模板进行表示: 本例的运行界面如下图所示: Roberts 滤波按钮对应的代码如下: Private Sub cmdRobertsFilter_Click() Dim i As Integer, j As Integer Dim PixelValue As Long Dim r As Integer, g As Integer, b As Integer Dim GrayValue As Integer Dim Temp(1, 1) As Integer Dim x As Integer, y As Integer Dim Dx As Integer, Dy As Integer Dim NGrayValue As Integer ' 设置目标图像的高度和宽度 DestImHeight = SourceImHeight - 1 ' 边界像素直接不要了 DestImWidth = SourceImWidth - 1 ' 设置目标 PictureBox 的大小 PicDest.Height = DestImHeight PicDest.Width = DestImWidth ReDim dbits(DestImHeight - 1, DestImWidth - 1, 2) As Byte ' 重新定义目标数组的维数 dbits = sbits ' 数组的直接复制,只有数组维数完全一样才可以 ' 图像的 Roberts 滤波 For i = 0 To SourceImHeight - 2 ' 边界像素不处理 For j = 0 To SourceImWidth - 2 NGrayValue = 0 For x = 0 To 1 For y = 0 To 1 r = sbits(i + x, j + y, 0) g = sbits(i + x, j + y, 1) b = sbits(i + x, j + y, 2) ' 插入图像处理的过程,对 r, g, b 进行处理 Temp(x, y) = 0.3 * r + 0.59 * g + 0.11 * b Next y Next x Dx = -Temp(0, 0) + Temp(1, 1) Dy = -Temp(0, 1) + Temp(1, 0) NGrayValue = Abs(Dx) + Abs(Dy) If NGrayValue 255 Then NGrayValue = 255 dbits(i, j, 0) = NGrayValue dbits(i, j, 1) = NGrayValue dbits(i, j, 2) = NGrayValue Next j Next i Dim tDBmpInfo As BITMAP Dim hDestBmp As Long hDestBmp = PicDest.Image.Handle ' 获得位图信息 Call GetObject(hDestBmp, Len(tDBmpInfo), tDBmpInfo) ReDim ImageArray(1 To DestImWidth * 4, 1 To DestImHeight) As Byte For i = 1 To DestImHeight For j = 1 To DestImWidth ImageArray((j - 1) * 4 + 1, i) = dbits(i - 1, j - 1, 2) ImageArray((j - 1) * 4 + 2, i) = dbits(i - 1, j - 1, 1) ImageArray((j - 1) * 4 + 3, i) = dbits(i - 1, j - 1, 0) Next j Next i ' 获得源图与目标图二进制位 Call SetBitmapBits(hDestBmp, tDBmpInfo.bmWidthBytes * tDBmpInfo.bmHeight, ImageArray(1, 1)) End Sub
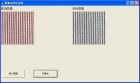
Visual Basic 与图像处理(三) 图像的锐化处理也是图像增强的一种方法,主要是为了突出图像中的部分细节或者增强被模糊了细节。从取样规律来说,在图像分辨率不足时,所获得的像素点可以认为是周围景物亮度的平均值,这种均值效率使得图像变得模糊,可以认为这种均值处理的方法与积分效应类似,与此相对,为了强化图像细节,可以对图像进行微分处理,后面介绍的锐化处理就可以看成为各种不同的微分算法。 从数学定义来看,微分的含义就是数据的变化率,由于图像是由离散的像素点表示的,因此图像的微分就是像素点的差值,称为差分。为了便于叙述,后文在不再区分微分和差分的概念。 5 、具有方向性的一阶微分算子 为了便于理解,首先从一些最简单的微分算子将其,这类一阶微分算法的最大特点就是可以获得图像中特定方向上的灰度变化情况,在特定的纹理分析、检测方法非常有效,有时会称为方向性锐化。 (1) 水平方向的微分算子 水平方向的微分算子就是为了获得图像在水平方向上的灰度变化率,对于像素点 f(x,y) ,水平算子的定义如下: 用前面讲述过的模板的概念,水平方向微分算法可以用下面的模板进行表示: 在实际运算中,可以对上述的计算结果取绝对值处理,以避免出现负值,本例的运行界面如下: 水平微分算子按钮对应代码如下: Private Sub cmdHonSharpFilter_Click() Dim i As Integer, j As Integer Dim PixelValue As Long Dim r As Integer, g As Integer, b As Integer Dim GrayValue As Integer Dim Temp(2, 2) As Integer Dim x As Integer, y As Integer Dim NGrayValue As Integer ' 设置目标图像的高度和宽度 DestImHeight = SourceImHeight - 2 ' 边界像素直接不要了 DestImWidth = SourceImWidth - 2 ' 设置目标 PictureBox 的大小 PicDest.Height = DestImHeight PicDest.Width = DestImWidth ReDim dbits(DestImHeight - 1, DestImWidth - 1, 2) As Byte ' 重新定义目标数组的维数 dbits = sbits ' 数组的直接复制,只有数组维数完全一样才可以 ' 图像的均值滤波直方图统计 For i = 1 To SourceImHeight - 2 ' 边界像素不处理 For j = 1 To SourceImWidth - 2 NGrayValue = 0 For x = 0 To 2 For y = 0 To 2 r = sbits(i + 1 - x, j + 1 - y, 0) g = sbits(i + 1 - x, j + 1 - y, 1) b = sbits(i + 1 - x, j + 1 - y, 2) ' 插入图像处理的过程,对 r, g, b 进行处理 Temp(x, y) = 0.3 * r + 0.59 * g + 0.11 * b Next y Next x NGrayValue = Abs(Temp(0, 0) + 2 * Temp(0, 1) + Temp(0, 2) - Temp(2, 0) - 2 * Temp(2, 1) - Temp(2, 2)) If NGrayValue 255 Then NGrayValue = 255 dbits(i - 1, j - 1, 0) = NGrayValue dbits(i - 1, j - 1, 1) = NGrayValue dbits(i - 1, j - 1, 2) = NGrayValue Next j Next i Dim tDBmpInfo As BITMAP Dim hDestBmp As Long hDestBmp = PicDest.Image.Handle ' 获得位图信息 Call GetObject(hDestBmp, Len(tDBmpInfo), tDBmpInfo) ReDim ImageArray(1 To DestImWidth * 4, 1 To DestImHeight) As Byte For i = 1 To DestImHeight For j = 1 To DestImWidth ImageArray((j - 1) * 4 + 1, i) = dbits(i - 1, j - 1, 2) ImageArray((j - 1) * 4 + 2, i) = dbits(i - 1, j - 1, 1) ImageArray((j - 1) * 4 + 3, i) = dbits(i - 1, j - 1, 0) Next j Next i ' 获得源图与目标图二进制位 Call SetBitmapBits(hDestBmp, tDBmpInfo.bmWidthBytes * tDBmpInfo.bmHeight, ImageArray(1, 1)) End Sub 垂直方向滤波的方法与水平方向锐化滤波的方法基本一致,只是将模板修改如下: 垂直方向滤波的界面如下: 垂直锐化滤波按钮对应的代码如下: Private Sub cmdVSharpFilter_Click() Dim i As Integer, j As Integer Dim PixelValue As Long Dim r As Integer, g As Integer, b As Integer Dim GrayValue As Integer Dim Temp(2, 2) As Integer Dim x As Integer, y As Integer Dim NGrayValue As Integer ' 设置目标图像的高度和宽度 DestImHeight = SourceImHeight - 2 ' 边界像素直接不要了 DestImWidth = SourceImWidth - 2 ' 设置目标 PictureBox 的大小 PicDest.Height = DestImHeight PicDest.Width = DestImWidth ReDim dbits(DestImHeight - 1, DestImWidth - 1, 2) As Byte ' 重新定义目标数组的维数 dbits = sbits ' 数组的直接复制,只有数组维数完全一样才可以 ' 图像的垂直锐化滤波 For i = 1 To SourceImHeight - 2 ' 边界像素不处理 For j = 1 To SourceImWidth - 2 NGrayValue = 0 For x = 0 To 2 For y = 0 To 2 r = sbits(i + 1 - x, j + 1 - y, 0) g = sbits(i + 1 - x, j + 1 - y, 1) b = sbits(i + 1 - x, j + 1 - y, 2) ' 插入图像处理的过程,对 r, g, b 进行处理 Temp(x, y) = 0.3 * r + 0.59 * g + 0.11 * b Next y Next x NGrayValue = Abs(Temp(0, 0) + 2 * Temp(1, 0) + Temp(2, 0) - Temp(0, 2) - 2 * Temp(1, 2) - Temp(2, 2)) If NGrayValue 255 Then NGrayValue = 255 dbits(i - 1, j - 1, 0) = NGrayValue dbits(i - 1, j - 1, 1) = NGrayValue dbits(i - 1, j - 1, 2) = NGrayValue Next j Next i Dim tDBmpInfo As BITMAP Dim hDestBmp As Long hDestBmp = PicDest.Image.Handle ' 获得位图信息 Call GetObject(hDestBmp, Len(tDBmpInfo), tDBmpInfo) ReDim ImageArray(1 To DestImWidth * 4, 1 To DestImHeight) As Byte For i = 1 To DestImHeight For j = 1 To DestImWidth ImageArray((j - 1) * 4 + 1, i) = dbits(i - 1, j - 1, 2) ImageArray((j - 1) * 4 + 2, i) = dbits(i - 1, j - 1, 1) ImageArray((j - 1) * 4 + 3, i) = dbits(i - 1, j - 1, 0) Next j Next i ' 获得源图与目标图二进制位 Call SetBitmapBits(hDestBmp, tDBmpInfo.bmWidthBytes * tDBmpInfo.bmHeight, ImageArray(1, 1)) End Sub
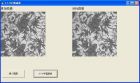
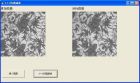
Visual Basic 与图像处理 ( 三 ) 4 、中值滤波 前面讲的均值滤波器等都是属于线性滤波器,容易带来图像细节的模糊,本节要讲的是一种非线性滤波器:中值滤波。中值滤波最早是有 J. W. Jukey 在 1971 年提出的一种一维信号处理技术,后来被拓展应用到二维图像处理技术之中。 所谓中值滤波,就是采用一个含有奇数个点的滑动窗口,将当前点灰度值(一般指窗口的中心点)用窗口中各点灰度值的中值来替代。由于一般采用的是奇数窗口,因此只要将各个像素点的灰度等级进行大小排序,中间的竖直就是中值;如果窗口是偶数(特殊情况)。就用排序后中间两个元素的均值来表示中值。 用前面均值滤波直接用线性方程来计算新的灰度值不一样的是,中值滤波首先要对当前窗口内的所有像素点的灰度值进行排序,一般有选择排序和冒泡排序两种方法,具体可参照相关的 Visual Basic 基础教程中的讲解,这里就不详细解释了。 中值滤波器窗口的形状有多种,有一维也有二维的,对于二维情况,中值滤波器的窗口形状和尺度对滤波结果影响也很大,因此需要根据实际的要求来选择滤波器的形状和尺寸。本例中示范一种最简单的 3 × 3 中值滤波,其余的情况读者可根据本例提供的相关代码适当修改得到,本例的运行界面如下: 3 × 3 中值滤波按钮对应的代码如下: Private Sub cmd33MedianFilter_Click() Dim i As Integer, j As Integer Dim PixelValue As Long Dim r As Integer, g As Integer, b As Integer Dim GrayValue As Integer Dim x As Integer, y As Integer Dim Temp(8) As Integer, TV As Integer Dim NGrayValue As Integer ' 设置目标图像的高度和宽度 DestImHeight = SourceImHeight DestImWidth = SourceImWidth ' 设置目标 PictureBox 的大小 PicDest.Height = DestImHeight PicDest.Width = DestImWidth ReDim dbits(DestImHeight - 1, DestImWidth - 1, 2) As Byte ' 重新定义目标数组的维数 dbits = sbits ' 数组的直接复制,只有数组维数完全一样才可以 ' 图像的中值滤波 For i = 1 To SourceImHeight - 2 ' 边界像素不处理 For j = 1 To SourceImWidth - 2 NGrayValue = 0 For x = 0 To 2 For y = 0 To 2 r = sbits(i + 1 - x, j + 1 - y, 0) g = sbits(i + 1 - x, j + 1 - y, 1) b = sbits(i + 1 - x, j + 1 - y, 2) ' 插入图像处理的过程,对 r, g, b 进行处理 Temp(x * 3 + y) = 0.3 * r + 0.59 * g + 0.11 * b Next y Next x ' 选择排序 For x = 0 To 7 For y = x + 1 To 8 If Temp(x) Temp(y) Then TV = Temp(x) Temp(x) = Temp(y) Temp(y) = TV End If Next y Next x dbits(i, j, 0) = Temp(4) dbits(i, j, 1) = Temp(4) dbits(i, j, 2) = Temp(4) Next j Next i Dim tDBmpInfo As BITMAP Dim hDestBmp As Long hDestBmp = PicDest.Image.Handle ' 获得位图信息 Call GetObject(hDestBmp, Len(tDBmpInfo), tDBmpInfo) ReDim ImageArray(1 To DestImWidth * 4, 1 To DestImHeight) As Byte For i = 1 To DestImHeight For j = 1 To DestImWidth ImageArray((j - 1) * 4 + 1, i) = dbits(i - 1, j - 1, 2) ImageArray((j - 1) * 4 + 2, i) = dbits(i - 1, j - 1, 1) ImageArray((j - 1) * 4 + 3, i) = dbits(i - 1, j - 1, 0) Next j Next i ' 获得源图与目标图二进制位 Call SetBitmapBits(hDestBmp, tDBmpInfo.bmWidthBytes * tDBmpInfo.bmHeight, ImageArray(1, 1)) End Sub
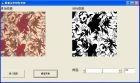
Visual Basic 与图像处理(三) 3 、特殊模板 有时候利用一些特殊的模板可以达到意外的效果,利用均值滤波类似的方法,只是改变模板就可能达到特殊的效果,这里以下面一个模板为例,可以达到边缘检测的效果: 下面是系统的 运行界面: 特殊模板按钮对应的代码如下: Private Sub cmdSpecialFilter_Click() Dim i As Integer, j As Integer Dim PixelValue As Long Dim r As Integer, g As Integer, b As Integer Dim GrayValue As Integer Dim Temp(2, 2) As Integer Dim x As Integer, y As Integer Dim NGrayValue As Integer ' 设置目标图像的高度和宽度 DestImHeight = SourceImHeight DestImWidth = SourceImWidth ' 设置目标 PictureBox 的大小 PicDest.Height = DestImHeight PicDest.Width = DestImWidth ReDim dbits(DestImHeight - 1, DestImWidth - 1, 2) As Byte ' 重新定义目标数组的维数 dbits = sbits ' 数组的直接复制,只有数组维数完全一样才可以 ' 图像的特殊模板滤波 For i = 1 To SourceImHeight - 2 ' 边界像素不处理 For j = 1 To SourceImWidth - 2 NGrayValue = 0 For x = 0 To 2 For y = 0 To 2 r = sbits(i + 1 - x, j + 1 - y, 0) g = sbits(i + 1 - x, j + 1 - y, 1) b = sbits(i + 1 - x, j + 1 - y, 2) ' 插入图像处理的过程,对 r, g, b 进行处理 Temp(x, y) = 0.3 * r + 0.59 * g + 0.11 * b Next y Next x NGrayValue = Temp(0, 1) + Temp(1, 0) + Temp(2, 1) + Temp(1, 2) - 4 * Temp(1, 1) If NGrayValue 0 Then NGrayValue = 0 If NGrayValue 255 Then NGrayValue = 255 dbits(i, j, 0) = NGrayValue dbits(i, j, 1) = NGrayValue dbits(i, j, 2) = NGrayValue Next j Next i Dim tDBmpInfo As BITMAP Dim hDestBmp As Long hDestBmp = PicDest.Image.Handle ' 获得位图信息 Call GetObject(hDestBmp, Len(tDBmpInfo), tDBmpInfo) ReDim ImageArray(1 To DestImWidth * 4, 1 To DestImHeight) As Byte For i = 1 To DestImHeight For j = 1 To DestImWidth ImageArray((j - 1) * 4 + 1, i) = dbits(i - 1, j - 1, 2) ImageArray((j - 1) * 4 + 2, i) = dbits(i - 1, j - 1, 1) ImageArray((j - 1) * 4 + 3, i) = dbits(i - 1, j - 1, 0) Next j Next i ' 获得源图与目标图二进制位 Call SetBitmapBits(hDestBmp, tDBmpInfo.bmWidthBytes * tDBmpInfo.bmHeight, ImageArray(1, 1)) End Sub
Visual Basic 与图像处理 ( 三 ) 从本节开始介绍图像增强的知识,在图像的传送和转换,比如复制、扫描等过程中总要造成图像品质的下降,因此需要提供一定的方法对这些降质的图像进行改善处理。常用的一种方法就是将图像中感兴趣的特征进行选择性的突出,减弱次要信息,当然这种方法虽然能提高图像的可读性,但是改善后的图像不一定逼近原始图像,比如突出目标的轮廓、衰减图像的各种噪声,通常把这类方法称为图像增强技术。当然还有一类方法也能改善图像的质量,称为图像复原,这里先不进行阐述。 图像增强的方法通常可分为两大类,第一类就是在空间域内对图像的像素点灰度值直接进行处理,比如区域内进行均值、中值滤波;第二类方法是在频域内进行滤波,即将图像变换到频域,在频域内对图像进行某种运算增强,再变换回空间域,这部分内容在以后也会讲述到。本章讲述的是第一类方法。 1、 均值滤波 均值滤波是图像增强中最简单的一类,主要是为了减少图像中的噪声信号,常见的有 3 × 3 , 5 × 5 均值滤波,高斯模板滤波等,首先从最简单的 3 × 3 均值滤波开始讲起。 所谓 3 × 3 均值滤波就是将原图像中每个人像素点的灰度值与其八邻域的八个像素点的灰度值累加,将求得的平均值作为新图像中该像素点的均值,可以用下面的简单模板表示这种滤波方法: 均值滤波中要考虑的是边界像素的处理,最简单的一种处理方法是边界像素不作相应的处理,当然也有其他的处理方法,比如在图像周围补充一些像素,本例中采用边界像素直接复制的方法,系统的运行界面如下: 3 × 3 均值滤波按钮对应的代码如下: Private Sub cmdGrayEqua_Click() Dim i As Integer, j As Integer Dim PixelValue As Long Dim r As Integer, g As Integer, b As Integer Dim GrayValue As Integer Dim Temp(2, 2) As Integer Dim x As Integer, y As Integer Dim NGrayValue As Integer ' 设置目标图像的高度和宽度 DestImHeight = SourceImHeight DestImWidth = SourceImWidth ' 设置目标 PictureBox 的大小 PicDest.Height = DestImHeight PicDest.Width = DestImWidth ReDim dbits(DestImHeight - 1, DestImWidth - 1, 2) As Byte ' 重新定义目标数组的维数 dbits = sbits ' 数组的直接复制,只有数组维数完全一样才可以 ' 图像的均值滤波直方图统计 For i = 1 To SourceImHeight - 2 ' 边界像素不处理 For j = 1 To SourceImWidth - 2 NGrayValue = 0 For x = 0 To 2 For y = 0 To 2 r = sbits(i + 1 - x, j + 1 - y, 0) g = sbits(i + 1 - x, j + 1 - y, 1) b = sbits(i + 1 - x, j + 1 - y, 2) ' 插入图像处理的过程,对 r, g, b 进行处理 Temp(x, y) = 0.3 * r + 0.59 * g + 0.11 * b NGrayValue = NGrayValue + Temp(x, y) Next y Next x dbits(i, j, 0) = NGrayValue / 9 dbits(i, j, 1) = NGrayValue / 9 dbits(i, j, 2) = NGrayValue / 9 Next j Next i Dim tDBmpInfo As BITMAP Dim hDestBmp As Long hDestBmp = PicDest.Image.Handle ' 获得位图信息 Call GetObject(hDestBmp, Len(tDBmpInfo), tDBmpInfo) ReDim ImageArray(1 To DestImWidth * 4, 1 To DestImHeight) As Byte For i = 1 To DestImHeight For j = 1 To DestImWidth ImageArray((j - 1) * 4 + 1, i) = dbits(i - 1, j - 1, 2) ImageArray((j - 1) * 4 + 2, i) = dbits(i - 1, j - 1, 1) ImageArray((j - 1) * 4 + 3, i) = dbits(i - 1, j - 1, 0) Next j Next i ' 获得源图与目标图二进制位 Call SetBitmapBits(hDestBmp, tDBmpInfo.bmWidthBytes * tDBmpInfo.bmHeight, ImageArray(1, 1)) End Sub 5 × 5 均值滤波方法与此类似,只是将模板扩大,改变其中的几句话即可,代码如下: Private Sub cmd55MeanFilter_Click() Dim i As Integer, j As Integer Dim PixelValue As Long Dim r As Integer, g As Integer, b As Integer Dim GrayValue As Integer Dim Temp(4, 4) As Integer Dim x As Integer, y As Integer Dim NGrayValue As Integer ' 设置目标图像的高度和宽度 DestImHeight = SourceImHeight DestImWidth = SourceImWidth ' 设置目标 PictureBox 的大小 PicDest.Height = DestImHeight PicDest.Width = DestImWidth ReDim dbits(DestImHeight - 1, DestImWidth - 1, 2) As Byte ' 重新定义目标数组的维数 dbits = sbits ' 数组的直接复制,只有数组维数完全一样才可以 ' 图像的均值滤波直方图统计 For i = 2 To SourceImHeight - 3 ' 边界像素不处理 For j = 2 To SourceImWidth - 3 NGrayValue = 0 For x = 0 To 4 For y = 0 To 4 r = sbits(i + 2 - x, j + 2 - y, 0) g = sbits(i + 2 - x, j + 2 - y, 1) b = sbits(i + 2 - x, j + 2 - y, 2) ' 插入图像处理的过程,对 r, g, b 进行处理 Temp(x, y) = 0.3 * r + 0.59 * g + 0.11 * b NGrayValue = NGrayValue + Temp(x, y) Next y Next x dbits(i, j, 0) = NGrayValue / 25 dbits(i, j, 1) = NGrayValue / 25 dbits(i, j, 2) = NGrayValue / 25 Next j Next i Dim tDBmpInfo As BITMAP Dim hDestBmp As Long hDestBmp = PicDest.Image.Handle ' 获得位图信息 Call GetObject(hDestBmp, Len(tDBmpInfo), tDBmpInfo) ReDim ImageArray(1 To DestImWidth * 4, 1 To DestImHeight) As Byte For i = 1 To DestImHeight For j = 1 To DestImWidth ImageArray((j - 1) * 4 + 1, i) = dbits(i - 1, j - 1, 2) ImageArray((j - 1) * 4 + 2, i) = dbits(i - 1, j - 1, 1) ImageArray((j - 1) * 4 + 3, i) = dbits(i - 1, j - 1, 0) Next j Next i ' 获得源图与目标图二进制位 Call SetBitmapBits(hDestBmp, tDBmpInfo.bmWidthBytes * tDBmpInfo.bmHeight, ImageArray(1, 1)) End Sub 对应的软件运行界面如下: 从上述两个图可以看出,无论是 3 × 3 均值滤波,还是 5 × 5 均值滤波,都在一定程度上使得图像变得模糊,也就是说在滤除噪声信号的同时,也损失了图像的部分细节信号。
Visual Basic 与图像处理(三) 通过动态数组减少 Point 方法的使用次数,可以有效的提高图像处理的速度, C 系列语言之所以在处理图像的时候速度较快,其实很大原因就是因为是从内存中直接读取图像数据。如果能完全放弃使用 Point 和 PSet 方法,直接获得图像数据,那么 Visual Basic 与 C 系列语言处理图像的速度并无明显差异,一种方法是直接读取文件的方法,对于初学者,还是不建议使用,因此没有必要,如果需要可以直接参考文件读取和写入的方法即可。这里推荐一种通过 API 函数直接完成图像读写的方法,主要涉及这样几个 API 函数: (1) 从 PictureBox 读入图像数据到数组中,用于取代 Point 方法。 Declare Function GetBitmapBits Lib "gdi32" (ByVal hBitmap As Long, ByVal dwCount As Long, lpBits As Any) As Long (2) 将数组数据直接映射到 PictureBox 中,用于取代 PSet 方法。 Declare Function SetBitmapBits Lib "gdi32" (ByVal hBitmap As Long, ByVal dwCount As Long, lpBits As Any) As Long (3) 获得控件句柄 Declare Function GetObject Lib "gdi32" Alias "GetObjectA" (ByVal hObject As Long, ByVal nCount As Long, lpObject As Any) As Long 为了便于对图像进行操作,自定义了一个数据类型 BIPMAP ,定义如下: Type BITMAP bmType As Long bmWidth As Long bmHeight As Long bmWidthBytes As Long bmPlanes As Integer bmBitsPixel As Integer bmBits As Long End Type 上述 API 函数定义和自定义变量都放置于标准模块之中。 在获取图像数据时,首先定义一个整型变量用于存放 PictureBox 中的图像句柄,然后调用 GetBitmapBits 函数获取图像数据,存放于数组中,需要注意的时, Visual Basic 获得的数据都默认为彩色图像,因此定义数组大小时,需要按照真彩色图像进行处理。将读取图像按钮代码做调整,使得读入图像的同时就获得图像数据,代码调整如下: Private Sub cmdReadImage_Click() Dim strFileName As String CDialog1.Filter = "bmp|*.bmp|jpg|*.jpg|gif|*.gif" ' 文件过滤,可以打开上述三类图像 CDialog1.ShowOpen If CDialog1.FileName "" Then strFileName = CDialog1.FileName PicSource.Picture = LoadPicture(strFileName) End If SourceImHeight = PicSource.Height SourceImWidth = PicSource.Width Dim tSBmpInfo As BITMAP Dim hSrcBmp As Long Dim x As Integer, y As Integer hSrcBmp = PicSource.Image.Handle ' 注意,这里只能使用 image ,而不能使用 picture ' 获得位图信息 Call GetObject(hSrcBmp, Len(tSBmpInfo), tSBmpInfo) ReDim ImageArray(1 To tSBmpInfo.bmWidthBytes, 1 To SourceImHeight) As Byte ' 获得源图与目标图二进制位 Call GetBitmapBits(hSrcBmp, tSBmpInfo.bmWidthBytes * tSBmpInfo.bmHeight, ImageArray(1, 1)) ' 注意起点是 (1,1) ReDim sbits(SourceImHeight - 1, SourceImWidth - 1, 2) As Byte ' 通过下面的转换,将数组转置为习惯的格式,当然也可以不转置,只是后面使用起来比较麻烦 For y = 1 To SourceImHeight For x = 1 To SourceImWidth sbits(y - 1, x - 1, 2) = ImageArray((x - 1) * 4 + 1, y) sbits(y - 1, x - 1, 1) = ImageArray((x - 1) * 4 + 2, y) sbits(y - 1, x - 1, 0) = ImageArray((x - 1) * 4 + 3, y) Next x Next y End Sub 在处理程序时,同样定义动态数组用于存储目标图像数据,处理完成后再利用 SetBitmapBits 一次性将数组显示于目标的 PictureBox 控件之中,同样以直方图均衡化为例,对应的“直方图均衡化按钮代码调整如下: Private Sub cmdGrayEqua_Click() Dim i As Integer, j As Integer Dim PixelValue As Long Dim r As Integer, g As Integer, b As Integer Dim GrayValue As Integer Dim Hist(255) As Long ' 存放原直方图统计结果 Dim P(255) As Single ' 存放原直方图概率 Dim PA(255) As Single ' 存放原直方图累计分布概率 Dim Map(255) As Single ' 存放灰度等级映射结果 Dim NGrayValue As Integer ' 设置目标图像的高度和宽度 DestImHeight = SourceImHeight DestImWidth = SourceImWidth ' 设置目标 PictureBox 的大小 PicDest.Height = DestImHeight PicDest.Width = DestImWidth ReDim dbits(DestImHeight - 1, DestImWidth - 1, 2) As Byte ' 重新定义目标数组的维数 ' 图像的直方图统计 For i = 0 To SourceImHeight - 1 For j = 0 To SourceImWidth - 1 r = sbits(i, j, 0) g = sbits(i, j, 1) b = sbits(i, j, 2) ' 插入图像处理的过程,对 r, g, b 进行处理 GrayValue = 0.3 * r + 0.59 * g + 0.11 * b Hist(GrayValue) = Hist(GrayValue) + 1 Next j Next i P(0) = Hist(0) / SourceImHeight / SourceImWidth Map(0) = 255 * P(0) For i = 1 To 255 P(i) = P(i - 1) + Hist(i) / SourceImHeight / SourceImWidth Map(i) = 255 * P(i) Next i ' 图像的直方图均衡化 For i = 0 To SourceImHeight - 1 For j = 0 To SourceImWidth - 1 r = sbits(i, j, 0) g = sbits(i, j, 1) b = sbits(i, j, 2) ' 插入图像处理的过程,对 r, g, b 进行处理 GrayValue = 0.3 * r + 0.59 * g + 0.11 * b dbits(i, j, 0) = Map(GrayValue) dbits(i, j, 1) = Map(GrayValue) dbits(i, j, 2) = Map(GrayValue) Next j Next i Dim tDBmpInfo As BITMAP Dim hDestBmp As Long hDestBmp = PicDest.Image.Handle ' 获得位图信息 Call GetObject(hDestBmp, Len(tDBmpInfo), tDBmpInfo) ReDim ImageArray(1 To DestImWidth * 4, 1 To DestImHeight) As Byte For i = 1 To DestImHeight For j = 1 To DestImWidth ImageArray((j - 1) * 4 + 1, i) = dbits(i - 1, j - 1, 2) ImageArray((j - 1) * 4 + 2, i) = dbits(i - 1, j - 1, 1) ImageArray((j - 1) * 4 + 3, i) = dbits(i - 1, j - 1, 0) Next j Next i ' 获得源图与目标图二进制位 Call SetBitmapBits(hDestBmp, tDBmpInfo.bmWidthBytes * tDBmpInfo.bmHeight, ImageArray(1, 1)) End Sub 初学者可能觉得本例比较复杂,一下子跳跃的跨度较大,但只要熟悉下来,流程还是基本一致的,后面在做一些实例时,可能感觉更为明显。前面在做点运算时,每次计算只需要使用到一个点,本章开始讲述图像的增强,一般需要同时涉及到多个像素点,这里提出的数组存储数据的方法也便于这样的操作。 通过比对可以发现,采用本例的方法以后, Visual Basic 处理图像的速度就跟平时见到的 C 系列语言处理的图像的速度基本一致,如果想要进一步提高处理速度,就需要研究算法方面的内容,这个就不在这里进行讨论了。
Visual Basic 与图像处理(三) Visual Basic 做图像处理其实一直未专业人员所不屑,很大原因在于其速度不快,甚至很多初步接触图像处理的学生也是提到就皱眉,其实 Visual Basic 做图像处理理论研究并不是那么一无是处,尤其对于初学者,毕竟容易上手,能够快速的进行研究,还是有很多优点的,这里就不再辩论这个问题。 前文已经讲述了点运算的知识,也结合了一些实例来阐述 Visual Basic 进行图像处理的方法,从本节开始逐步进入稍微复杂的问题,但首先要解决的就是常说的处理速度的问题。本节还是从直方图均衡化那个实例下手,从实例分析来逐步提高运行速度。 引起 Visual Basic 图像处理速度慢的很大原因是前面说的非常多的两个函数 Point 和 PSet 方法,一个是从控件中取颜色点,一个是往控件界面上设置颜色点,无论取点还是设置点,都是要调用显存的,这显然会降低速度。在前面的直方图均衡化程序中,在灰度统计的时候遍历了一次图像,挨个取颜色点的值,而在后面设置颜色点,得到目标图像的时候,又得遍历一次图像,我们能想到的第一个办法就是尽量减少使用 Point 和 PSet 的次数。前面提到过,图像的本质就是一个矩阵,而矩阵在程序设计中往往是用数组进行表示的,如果在第一次取点以后就把得到的数据放置于数组中,那么后文再次调用这些数据时,就可以直接调用这个数组,可以有效的提高程序运行速度。 本例基于上述思路,采用数组来存储图像数据,由于在程序运行前,图像数据大小还不知道,因此需要采用动态数组来实现数据的存储,运行界面与前面的一样,如下图所示: 首先在窗口模块中定位了两个窗口级别的动态数组 SourceImData() 和 DestImData() ,在得到图像的高度和宽度以后就可以定义数组的大小,通过数组可以减少使用 Point 方法的次数,直方图均衡化按钮对应的代码调整如下: Private Sub cmdGrayEqua_Click() Dim i As Integer, j As Integer Dim PixelValue As Long Dim r As Integer, g As Integer, b As Integer Dim GrayValue As Integer Dim Hist(255) As Long ' 存放原直方图统计结果 Dim P(255) As Single ' 存放原直方图概率 Dim PA(255) As Single ' 存放原直方图累计分布概率 Dim Map(255) As Single ' 存放灰度等级映射结果 Dim NGrayValue As Integer ' 设置目标图像的高度和宽度 DestImHeight = SourceImHeight DestImWidth = SourceImWidth ' 设置目标 PictureBox 的大小 PicDest.Height = DestImHeight PicDest.Width = DestImWidth ReDim SourceImData(SourceImHeight - 1, SourceImWidth - 1) As Integer ReDim DestImData(DestImHeight - 1, DestImWidth - 1) As Integer ' 图像的直方图统计 For i = 0 To SourceImHeight - 1 For j = 0 To SourceImWidth - 1 PixelValue = PicSource.Point(j, i) r = PixelValue Mod 256 g = (PixelValue \ 256) Mod 256 b = PixelValue \ 65536 ' 插入图像处理的过程,对 r, g, b 进行处理 GrayValue = 0.3 * r + 0.59 * g + 0.11 * b SourceImData(i, j) = GrayValue Hist(GrayValue) = Hist(GrayValue) + 1 Next j Next i P(0) = Hist(0) / SourceImHeight / SourceImWidth Map(0) = 255 * P(0) For i = 1 To 255 P(i) = P(i - 1) + Hist(i) / SourceImHeight / SourceImWidth Map(i) = 255 * P(i) Next i ' 图像的直方图均衡化 For i = 0 To SourceImHeight - 1 For j = 0 To SourceImWidth - 1 NGrayValue = Map(SourceImData(i, j)) PicDest.PSet (j, i), RGB(NGrayValue, NGrayValue, NGrayValue) Next j Next i End Sub 如果细心对比,会发现通过这样一个改变,已经能稍微提高该程序的运行速度了,当然还是没有达到理想的要求,后面会继续讨论。
Visual Basic 与图像处理 ( 二 ) 9 、直方图均衡化 直方图均衡化也成为灰度均衡,是点运算较为复杂的一种,其基本原理是对图像中像素个数较多的灰度区域进行范围拓宽,而对像素较少的灰度区域,即在图像画面中不起主要作用的灰度值进行归并。一般在图像比较或者分割之前进行直方图均衡,可以使图像具有较为一致格式。比如由于光照条件使得同一背景图像有较大的亮度反差就可以利用直方图均衡化进行亮度调整。 设 f(i, j), g(i, j) 分别为原图像和处理后的图像,图像的灰度等级变换范围为 ,直方图均衡化可以按照以下的步骤进行: (1) 原图像直方图统计结果为 Hist ; (2) 求原图像直方图的灰度分布概率,记作 p ; (3) 计算元图像各个灰度等级的累计分布概率,记作 PA ,显然 PA =0, PA =1 ; (4) 进行直方图均衡化新的灰度值计算,将新的灰度值存放于映射 Map 中,其中: Map =255 × PA 。 从上述步骤来看,要做直方图均衡化,首先要计算直方图统计结果,然后再得到每个灰度等级对应的新的灰度等级,最后才能完成直方图均衡化操作。程序的实现与前面的类似,这里不在详细讲述,该例的运行界面如下图所示: 直方图均衡化按钮对应的代码如下: Private Sub cmdGrayEqua_Click() Dim i As Integer, j As Integer Dim PixelValue As Long Dim r As Integer, g As Integer, b As Integer Dim GrayValue As Integer Dim Hist(255) As Long ' 存放原直方图统计结果 Dim P(255) As Single ' 存放原直方图概率 Dim PA(255) As Single ' 存放原直方图累计分布概率 Dim Map(255) As Single ' 存放灰度等级映射结果 Dim NGrayValue As Integer ThresholdValue = Val(txtThreshold) ' 设置目标图像的高度和宽度 DestImHeight = SourceImHeight DestImWidth = SourceImWidth ' 设置目标 PictureBox 的大小 PicDest.Height = DestImHeight PicDest.Width = DestImWidth ' 图像的直方图统计 For i = 0 To SourceImHeight - 1 For j = 0 To SourceImWidth - 1 PixelValue = PicSource.Point(j, i) r = PixelValue Mod 256 g = (PixelValue \ 256) Mod 256 b = PixelValue \ 65536 ' 插入图像处理的过程,对 r, g, b 进行处理 GrayValue = 0.3 * r + 0.59 * g + 0.11 * b Hist(GrayValue) = Hist(GrayValue) + 1 Next j Next i P(0) = Hist(0) / SourceImHeight / SourceImWidth Map(0) = 255 * P(0) For i = 1 To 255 P(i) = P(i - 1) + Hist(i) / SourceImHeight / SourceImWidth Map(i) = 255 * P(i) Next i ' 图像的直方图均衡化 For i = 0 To SourceImHeight - 1 For j = 0 To SourceImWidth - 1 PixelValue = PicSource.Point(j, i) r = PixelValue Mod 256 g = (PixelValue \ 256) Mod 256 b = PixelValue \ 65536 ' 插入图像处理的过程,对 r, g, b 进行处理 GrayValue = 0.3 * r + 0.59 * g + 0.11 * b NGrayValue = Map(GrayValue) PicDest.PSet (j, i), RGB(NGrayValue, NGrayValue, NGrayValue) Next j Next i End Sub
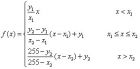
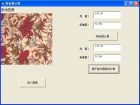
Visual Basic 与图像处理 ( 二 ) 8 、灰度拉伸 灰度拉伸是将图像中不同灰度等级按照预定的方式进行拉伸,从实质上来说灰度拉伸是灰度线性变换的一种延伸,当然也不完全等同于灰度线性变换,而是对灰度等级进行分段,然后分别进行线性变换。灰度拉伸可以用下面的函数表达式表示: 式中 (x1, y1) 和 (x2, y2) 是灰度拉伸中两个转折点的坐标,如下图中的 A , B 两点。 相比于线性变换,灰度拉伸可以更灵活更改图像的灰度,可以根据需要选择性的变换某个灰度等级范围内的像素点。在本例中,采用图形化控制的方法设定上述两个转折点,这里涉及了一个平时称为“橡皮筋”的技术,在网络上有很多介绍橡皮筋技术的文章,在 Visual Basic 中利用 DrawMode 属性可以非常便捷的实现所谓的橡皮筋效果。在本例中专门放置了一个用于设定转折点的 PictureBox 控件,在 PictureBox 中鼠标左键按下时,选择第一个转折点,然后鼠标拖动到第二个转折点松开鼠标左键,当鼠标左键再次按下时,将 PictureBox 清空,重新设置转折点。整个系统的运行界面如下: 其中灰度拉伸按钮对应的代码如下: Private Sub cmdGrayStrech_Click() Dim i As Integer, j As Integer Dim PixelValue As Long Dim r As Integer, g As Integer, b As Integer Dim GrayValue As Integer Dim Map(255) As Integer ' 采用映射模式计算拉伸后的灰度 Dim k(2) As Single, t(2) As Integer ' 存放三条直线的斜率和截距 Dim NGrayValue As Integer ThresholdValue = Val(txtThreshold) ' 设置目标图像的高度和宽度 DestImHeight = SourceImHeight DestImWidth = SourceImWidth ' 设置目标 PictureBox 的大小 PicDest.Height = DestImHeight PicDest.Width = DestImWidth ' 第一条直线斜率和截距 k(0) = (255 - StartPY - 0) / (StartPX - 0) t(0) = 0 For i = 0 To StartPX Map(i) = i * k(0) + t(0) Next i ' 第二条直线斜率和截距 k(1) = ((255 - EndPY) - (255 - StartPY)) / (EndPX - StartPX) t(1) = (255 - EndPY) - k(1) * EndPX For i = StartPX + 1 To EndPX Map(i) = i * k(1) + t(1) Next i ' 第二条直线斜率和截距 k(2) = (255 - (255 - EndPY)) / (255 - EndPX) t(2) = (255 - EndPY) - k(2) * EndPX For i = EndPX + 1 To 255 Map(i) = i * k(2) + t(2) Next i ' 图像的灰度拉伸变换 For i = 0 To SourceImHeight - 1 For j = 0 To SourceImWidth - 1 PixelValue = PicSource.Point(j, i) r = PixelValue Mod 256 g = (PixelValue \ 256) Mod 256 b = PixelValue \ 65536 ' 插入图像处理的过程,对 r, g, b 进行处理 GrayValue = 0.3 * r + 0.59 * g + 0.11 * b NGrayValue = Map(GrayValue) PicDest.PSet (j, i), RGB(NGrayValue, NGrayValue, NGrayValue) Next j Next i End Sub 这里涉及的数组映射也是经常使用的一种技术,可以有效的提高软件的运行速度。 实现橡皮筋效应及转折点设置的代码分为三个部分,首先是鼠标左键按下,确定第一个转折点,然后是鼠标拖动时,实现的橡皮筋效果,最后鼠标左键抬起时,确定第二个转折点。第一个转折点和第二个转折点分别用窗口级变量来表示,分别是 StartPX, StartPY, EndPX, EndPY ,以便于后面计算直线的斜率和截距。 鼠标左键按下的代码如下: Private Sub PicDraw_MouseDown(Button As Integer, Shift As Integer, X As Single, Y As Single) If Button = vbLeftButton Then ' 将 PictureBox 清空 PicDraw.Cls ' 画个边框 PicDraw.Line (0, 0)-(0, 255), RGB(255, 255, 255) PicDraw.Line (0, 0)-(255, 0), RGB(255, 255, 255) PicDraw.Line (0, 255)-(255, 255), RGB(255, 255, 255) PicDraw.Line (255, 0)-(255, 255), RGB(255, 255, 255) ' 鼠标左键已经按下 Flag = True StartPX = X StartPY = Y txtFirst = "(" Str(StartPX) ", " Str(255 - StartPY) ")" Label8.Left = StartPX Label8.Top = StartPY Label8.Caption = txtFirst PicDraw.Line (0, PicDraw.Height - 1)-(StartPX, StartPY), RGB(255, 255, 0) PicDraw.Line (StartPX, PicDraw.Height - 1)-(StartPX, StartPY), RGB(255, 0, 0) PicDraw.Line (0, StartPY)-(StartPX, StartPY), RGB(255, 0, 0) EndPX = X EndPY = Y End If End Sub 由于 DrawMode 模式是异或,因此设置颜色时需要根据互补色。 鼠标拖动的代码如下,注意观察如何实现橡皮筋效果: Private Sub PicDraw_MouseMove(Button As Integer, Shift As Integer, X As Single, Y As Single) If Flag = True Then ' 擦去前面的线条 PicDraw.Line (StartPX, StartPY)-(EndPX, EndPY), RGB(255, 255, 0) ' 由于取的是异或,为了画蓝色的线,将前面两个量满置 EndPX = X EndPY = Y ' 画上新的线条,实现橡皮筋效果 PicDraw.Line (StartPX, StartPY)-(EndPX, EndPY), RGB(255, 255, 0) End If End Sub 鼠标左键抬起的时候,确定第二个转折点,代码如下: Private Sub PicDraw_MouseUp(Button As Integer, Shift As Integer, X As Single, Y As Single) EndPX = X EndPY = Y txtSecond = "(" Str(EndPX) ", " Str(255 - EndPY) ")" Label9.Left = EndPX Label9.Top = EndPY Label9.Caption = txtSecond PicDraw.Line (EndPX, EndPY)-(PicDraw.Width - 1, 0), RGB(255, 255, 0) PicDraw.Line (PicDraw.Width - 1, EndPY)-(EndPX, EndPY), RGB(255, 0, 0) PicDraw.Line (EndPX, 0)-(EndPX, EndPY), RGB(255, 0, 0) Flag = False End Sub 需要注意的是 DrawMode 设置为 Xor Pen 表示在同一位置画同样的线时,将把原来的线擦除,从而可以实现橡皮筋效应,在窗体窗体时对 DrawMode 进行设置,代码如下: Private Sub Form_Load() PicDraw.DrawMode = 7 ' vbXorPen End Sub
Visual Basic 与图像处理(二) 7 、灰度窗口变换 灰度窗口变换是选择窗口中部分灰度等级的一种点运算方式,其实现方法与阈值变换类似。选择一定的灰度等级范围,在该范围内的灰度值保持不变,小于该范围下限的灰度值设置为 0 (黑色),而大于该范围上限的灰度值设置为 255 (白色)。灰度窗口变换可以用下面的函数形式进行表达: 这里的 L 表示窗口范围的下限, H 表示窗口范围的上限。 灰度窗口变换的在平时用途较为广泛,比如利用灰度窗口变换可以消除较暗或者较亮的背景,在软件设计时,该例与阈值变换非常相似,同样由两个 PictureBox 组成,另外在窗口中放置了两个文本框,分别用于存放窗口范围的下限和上限。本例的运行界面如下图所示 : 窗口变换按钮对应的代码如下: Private Sub cmdWindowTrans_Click() Dim i As Integer, j As Integer Dim PixelValue As Long Dim r As Integer, g As Integer, b As Integer Dim GrayValue As Integer Dim NGrayValue As Integer Dim L As Integer, H As Integer ThresholdValue = Val(txtThreshold) ' 设置目标图像的高度和宽度 DestImHeight = SourceImHeight DestImWidth = SourceImWidth ' 设置目标 PictureBox 的大小 PicDest.Height = DestImHeight PicDest.Width = DestImWidth L = Val(txtL) H = Val(txtH) ' 图像的窗口变换 For i = 0 To SourceImHeight - 1 For j = 0 To SourceImWidth - 1 PixelValue = PicSource.Point(j, i) r = PixelValue Mod 256 g = (PixelValue \ 256) Mod 256 b = PixelValue \ 65536 ' 插入图像处理的过程,对 r, g, b 进行处理 GrayValue = 0.3 * r + 0.59 * g + 0.11 * b If GrayValue L Then NGrayValue = 0 ElseIf GrayValue H Then NGrayValue = 255 Else NGrayValue = GrayValue End If PicDest.PSet (j, i), RGB(NGrayValue, NGrayValue, NGrayValue) Next j Next i End Sub
Visual Basic 与图像处理 ( 二 ) 6 、阈值变换 图像的阈值变换可以将一幅图像变为黑白二值图像,即按照设定的阈值,如果图像中像素点的灰度值小于该阈值,则将该像素点的灰度值设定为 0 ,在图像中显示为黑色,否则将改点的灰度值设定为 255 ,在图像中显示为白色。有时候为强化阈值后的效果,也会将阈值结果进行反相。 阈值变换的原理可以表达为如下的函数形式: 这里的 T 就是设定的阈值。 阈值变换的实现方法也比较简单,在本例示范时,增加了一个水平滚动条用于设定阈值,其余界面与灰度线性变换的类似,软件的界面如下图所示: 这里用一个 ThresholdValued 窗体级别变量作为阈值,其中阈值变换按钮对于的代码如下: Private Sub cmdThresholdTrans_Click() Dim i As Integer, j As Integer Dim PixelValue As Long Dim r As Integer, g As Integer, b As Integer Dim GrayValue As Integer Dim NGrayValue As Integer ThresholdValue = Val(txtThreshold) ' 设置目标图像的高度和宽度 DestImHeight = SourceImHeight DestImWidth = SourceImWidth ' 设置目标 PictureBox 的大小 PicDest.Height = DestImHeight PicDest.Width = DestImWidth ' 彩色图像的阈值变换 For i = 0 To SourceImHeight - 1 For j = 0 To SourceImWidth - 1 PixelValue = PicSource.Point(j, i) r = PixelValue Mod 256 g = (PixelValue \ 256) Mod 256 b = PixelValue \ 65536 ' 插入图像处理的过程,对 r, g, b 进行处理 GrayValue = 0.3 * r + 0.59 * g + 0.11 * b If GrayValue ThresholdValue Then NGrayValue = 0 Else NGrayValue = 255 PicDest.PSet (j, i), RGB(NGrayValue, NGrayValue, NGrayValue) Next j Next i End Sub 滚动条对应的代码如下: Private Sub HScroll1_Change() txtThreshold = Str(HScroll1.Value) End Sub 当文本框失去焦点时,也自动更改阈值,对应的代码如下: Private Sub txtThreshold_LostFocus() HScroll1.Value = Val(txtThreshold) End Sub
Visual Basic 与图像处理 ( 二 ) 5 、灰度线性变换 灰度线性变换也是一种典型的点运算,原理也比较简单,就是将图像中所有像素点的灰度按照线性函数进行变换,以 D image 表示目标图像, S image 表示源图像,灰度线性变换可以理解为: D image =k*S image +b 其中 k 为线性函数的斜率, b 为线性函数在 y 轴上的截距。当 k1 时,整个图像灰度的分布区域将变大,目标图像的整体对比度增大;反之,当 k1 时,整个图像灰度的分布区域将变小,目标图像的整体对比度减小;而 k=1 时,目标图像所有像素点的灰度增大或者减小,使得图像整体变亮或者变暗,而图像的整体对比度并不发生改变。 有两种特殊情况,当 k=1 , b=0 时,目标图像与原图像;而当 k=-1 , b=255 时,目标图像的灰度正好与原图像反转,就是平时所说的反相。 对于给定的 k 值和 b 值,对图像进行灰度线性变换比较简单,软件界面与灰度化处理的程序类似,直接更改其中的几句代码即可,软件的运行界面如下: 灰度线性变换按钮对应的代码如下: Private Sub cmdLinearTrans_Click() Dim i As Integer, j As Integer Dim PixelValue As Long Dim r As Integer, g As Integer, b As Integer Dim GrayValue As Integer Dim NGrayValue As Integer Dim k As Integer, t As Integer ' 改用字母 t ,避免与颜色值变量重复 ' 设置目标图像的高度和宽度 DestImHeight = SourceImHeight DestImWidth = SourceImWidth ' 设置目标 PictureBox 的大小 PicDest.Height = DestImHeight PicDest.Width = DestImWidth k = Val(txtK) t = Val(txtB) ' 彩色图像的灰度线性变换 For i = 0 To SourceImHeight - 1 For j = 0 To SourceImWidth - 1 PixelValue = PicSource.Point(j, i) r = PixelValue Mod 256 g = (PixelValue \ 256) Mod 256 b = PixelValue \ 65536 ' 插入图像处理的过程,对 r, g, b 进行处理 GrayValue = 0.3 * r + 0.59 * g + 0.11 * b NGrayValue = k * GrayValue + t If NGrayValue 255 Then NGrayValue = 255 ' 如果超过 255 ,统一设定为 255 If NGrayValue 0 Then NGrayValue = 0 ' 如果小于 0 ,统一设定为 0 PicDest.PSet (j, i), RGB(NGrayValue, NGrayValue, NGrayValue) Next j Next i End Sub 特殊情况下,当 k=-1 , b=255 时,实现的是图像的反相,效果如下图所示:
Visual Basic 与图像处理 ( 二 ) 4 、基于灰度直方图的灰度特征值计算 前文介绍过直接基于图像的每个像素点计算图像的均值和方差,在得到图像的灰度直方图统计以后,还可以根据直方图统计结果进行图像均值和方差的计算,这种算法效率更高,程序运行更快,尤其对于尺寸较大的图像,这种优势更为明显。算法的本质是将灰度等级相同的像素点进行归类,一次性计算出其和值,然后来计算均值和方差。本例将这种算法与前文直接根据像素点计算的方法进行比对,软件的界面如下: 从图中可以看出,两者的结果是一致的,其中基于直方图的特征计算按钮对应的代码如下: Private Sub cmdCalFeatureBaseHist_Click() Dim i As Integer, j As Integer Dim PixelValue As Long Dim r As Integer, g As Integer, b As Integer Dim GrayValue As Integer Dim Hist(0 To 255) As Long Dim SumValue As Long Dim MeanValue As Single Dim StdValue As Single ' 直方图统计 For i = 0 To SourceImHeight - 1 For j = 0 To SourceImWidth - 1 PixelValue = PicSource.Point(j, i) r = PixelValue Mod 256 g = (PixelValue \ 256) Mod 256 b = PixelValue \ 65536 ' 插入图像处理的过程,对 r, g, b 进行处理 GrayValue = 0.3 * r + 0.59 * g + 0.11 * b Hist(GrayValue) = Hist(GrayValue) + 1 Next j Next i ' 图像均值计算 For i = 1 To 255 ' 计算和值是,灰度等级为 0 的直接省略 SumValue = SumValue + Hist(i) * i Next i MeanValue = SumValue / SourceImHeight / SourceImWidth MeanValue = Format(MeanValue, "0.00") ' 保留两位小数 txtNewMean = Str(MeanValue) ' 图像标准差计算 SumValue = 0 For i = 0 To 255 SumValue = SumValue + (i - MeanValue) ^ 2 * Hist(i) Next i StdValue = Sqr(SumValue / SourceImHeight / SourceImWidth) StdValue = Format(StdValue, "0.00") ' 保留两位小数 txtNewStd = Str(StdValue) End Sub
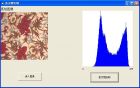
Visual Basic 与图像处理 ( 二 ) 3 、灰度直方图 灰度直方图是描述图像中像素灰度分布的一个统计图,简而言之就是描述图像中每个灰度值像素的个数或者概率,横坐标对应就是图像的灰度级别,纵坐标是该灰度级别对应的像素个数(或概率)。要得到图像的灰度直方图,首先要完成各灰度级别对应像素个数的统计,将统计结果存放于 Hist 数组中,然后再根据这个数组进行直方图的绘制。 基于前面的编程基础,相信要完成直方图统计应该都没有问题,这里要简要介绍一下直方图绘制的方法。前文提及过, PictureBox 不仅支持图像的读写,还支持图形的绘制,在这里为简便起见,只用一系列直线进行直方图的绘制, PictureBox 的 Line 方法可用于直线的绘制,其原型如下: object.Line (x1, y1) - (x2, y2), , 这里 (x1,y1) 为直线的起点, (x2,y2) 为直线的终点,如果没有 Step 表示直接从起点画到终点,如果有关键字 Step ,表示分别沿着 x1 , y1 在横向和纵向绘制 x2, y2 的长度, color 用于设置直线的颜色,可用 RGB 函数进行设定。如果使用了 B 选项,则 F 选项规定矩形以矩形边框的颜色填充。不能不用 B 而用 F 。如果不用 F 光用 B ,则矩形用当前的 FillColor 和 FillStyle 填充, FillStyle 的缺省值是 Transparent ,由于本例中只画直线,因此 B 选项和 F 选项都不选用。 在直方图绘制时,首先要确定每个灰度等级对应的线段长度,这里采用常见的一种方法,即首先找出统计概率最高的灰度等级,设定其绘制长度,其余灰度等级绘制的线段长度与该灰度等级成对比,假设概率最高的灰度等级对应的绘制长度为 L ,其他灰度等级的线段绘制长度可按照下面的方式进行计算: L gray = L * Hist / Hist max 首先对程序界面进行设计,本例主要由两个 PictureBox 组成,其中一个 PictureBox 用于存放图像,另一个用于直方图的绘制。用于直方图绘制的 PictureBox 宽度直接设置为 256 个像素,即每个灰度等级绘制的直线占的宽度都是 1 个像素。该程序的软件运行界面如下: 直方图绘制按钮对应的代码如下: Private Sub cmdHist_Click() Dim i As Integer, j As Integer Dim PixelValue As Long Dim r As Integer, g As Integer, b As Integer Dim GrayValue As Integer Dim Hist(0 To 255) As Long Dim maxHist As Long, L As Integer, L0 As Integer ' 直方图统计 For i = 0 To SourceImHeight - 1 For j = 0 To SourceImWidth - 1 PixelValue = PicSource.Point(j, i) r = PixelValue Mod 256 g = (PixelValue \ 256) Mod 256 b = PixelValue \ 65536 ' 插入图像处理的过程,对 r, g, b 进行处理 GrayValue = 0.3 * r + 0.59 * g + 0.11 * b Hist(GrayValue) = Hist(GrayValue) + 1 Next j Next i ' 直方图绘制 ' 第一步,寻找 Hist 数组中的最大值,即灰度等级统计概率最高者 maxHist = Hist(0) For i = 1 To 255 If maxHist Hist(i) Then maxHist = Hist(i) Next i ' 绘制直方图,其中最高概率的灰度等级绘制长度与 PictureBox 的高度一致 L = PicHist.Height For i = 0 To 255 L0 = L * Hist(i) / maxHist PicHist.Line (i, L - 1)-Step(0, -L0), RGB(0, 0, 255) ' 绘制蓝色线条 Next i End Sub
Visual Basic 与图像处理 ( 二 ) 2 、图像的特征值计算 这里所说图像的特征值是指可以直接从图像中提取出来的特征参数,常用于对图像的整体性评价,如图像的灰度均值可以用于判断图像整体亮度的高低。在图像灰度化的基础上可以很便捷的完成图像特征值的计算,本例中以两个基本的特征参数计算作为示范:均值和标准差。从本质上来说,图像灰度化以后就相当于一个二维矩阵,因此均值的计算只要求得图像中所有像素点的灰度值之和,再除以图像的高度与宽度的乘积即可,图像的标准差计算方法与此类似。以 MeanValue 和 StdValue 分别表示图像的均值和标准差,其计算公式如下: 首先设计程序的软件界面,本例中运行界面如下图: 同样“读入图像”按钮的代码与前文类似,这里给出特征值计算按钮对于的程序代码: Private Sub cmdCalFeature_Click() Dim i As Integer, j As Integer Dim PixelValue As Long Dim r As Integer, g As Integer, b As Integer Dim GrayValue As Integer Dim SumValue As Long Dim MeanValue As Single Dim StdValue As Single ' 图像均值计算 For i = 0 To SourceImHeight - 1 For j = 0 To SourceImWidth - 1 PixelValue = PicSource.Point(j, i) r = PixelValue Mod 256 g = (PixelValue \ 256) Mod 256 b = PixelValue \ 65536 ' 插入图像处理的过程,对 r, g, b 进行处理 GrayValue = 0.3 * r + 0.59 * g + 0.11 * b SumValue = SumValue + GrayValue Next j Next i MeanValue = SumValue / SourceImHeight / SourceImWidth MeanValue = Format(MeanValue, "0.00") ' 保留两位小数 txtMeanValue = Str(MeanValue) ' 图像标准差计算 SumValue = 0 For i = 0 To SourceImHeight - 1 For j = 0 To SourceImWidth - 1 PixelValue = PicSource.Point(j, i) r = PixelValue Mod 256 g = (PixelValue \ 256) Mod 256 b = PixelValue \ 65536 ' 插入图像处理的过程,对 r, g, b 进行处理 GrayValue = 0.3 * r + 0.59 * g + 0.11 * b SumValue = SumValue + (GrayValue - MeanValue) ^ 2 Next j Next i StdValue = Sqr(SumValue / SourceImHeight / SourceImWidth) StdValue = Format(StdValue, "0.00") ' 保留两位小数 txtStdValue = Str(StdValue) End Sub
Visual Basic 与图像处理 ( 二 ) 有了上面介绍的 Point 和 PSet 方法以后就可以进入真正的图像处理阶段了,与平时学习一样,这里同样从最简单的图像处理技术——点运算开始讲起。点运算简而言之就是对图像进行逐点运算,得到所需要的特征参数或者新的图像。点运算之所以简单是因为点运算每次只需要考虑当前一个像素点的颜色值,当然点运算不可能改变图像内的空间关系。 点运算中最简单是获得图像的特征参数包括均值、方差等,另一种就是按照特定的方式对图像的直方图进行改变,这里的特定方式可以看成是从像素到像素的操作,常见的有对比度增强、对比度拉伸或灰度变换。后面将从图像灰度化、特征参数计算、直方图统计、灰度线性变换、灰度拉伸、直方图均衡化等几种常用的实例进行讲解,同时以 Visual Basic 软件进行算法实现。 1、 图像的灰度化 图像的灰度化是指将原始的彩色图像转换为灰度图像,这也是后续其他点运算操作的先前操作,也就是说点运算是基于灰度图像进行的。彩色图像中 Red 、 Green 、 Blue 三个分量值相等时,呈现出的就是一种灰度化的效果,因此要讲彩色图像转换为灰度图像只要将上述三个分量值设置为同样的值即可。这里需要讨论的只是设置灰度值的方法,有一种最简单的方法是取三个分量中的一个或者是平均值,但在实践中发现这种简单的转换方法与人的视觉习惯不太符合,因此有许多公司在研究这种灰度转换模型,在本节中,我们采用加权平均的方法实现图像的灰度化,方法如下: Gray = 0.3*Red+0.59*Green+0.11*Blue 下面通过一个实例实现彩色图像的灰度化,本例是后续点运算的基础,同样第一次涉及图像处理的完整流程,因此讲述的稍微详细一点。 为了强调原始图像与目标图像的概念,这也是在一般图像处理软件里面都会涉及的,本例中在窗体中放置两个 PictureBox 控件,分别用于存放原始图像与目标图像。 读取图像的方法与前文介绍的一致,即用 LoadPicture 函数进行图像读取,在获得原始图像的高度和宽度以后,按照预定方式进行目标图像的高度和宽度设置,然后利用循环语句遍历原始图像,逐个改变原始图像中每个像素点的值,并将其赋值到目标图像中,就可以完成图像的点运算。这里的循环语句是后面其他图像处理中也经常需要使用的一个标准过程,其基本格式如下 For i = 0 To h - 1 For j = 0 To w - 1 PixelValue = Picture1.Point(j, i) r = PixelValue Mod 256 g = (PixelValue \ 256) Mod 256 b = PixelValue \ 65536 ’ 插入图像处理的过程,对 r, g, b 进行处理 …….………………………………. Picture2.PSet (j, i), RGB(RValue, GValue, BValue) Next j Next i 这里需要注意观察的是 Point 和 PSet 方法中坐标的位置,第一个坐标是横坐标,第二个坐标是纵坐标。 有了这个标准过程就可以理解图像灰度化处理的基本代码了,首先设计该程序的软件界面,效果如下图所示: 这里读入图像按钮的代码与前文类似,这里不在阐述,下面是灰度化按钮对于代码: Private Sub cmdGray_Click() Dim i As Integer, j As Integer Dim PixelValue As Long Dim r As Integer, g As Integer, b As Integer Dim GrayValue As Integer ' 设置目标图像的高度和宽度 DestImHeight = SourceImHeight DestImWidth = SourceImWidth ' 设置目标 PictureBox 的大小 PicDest.Height = DestImHeight PicDest.Width = DestImWidth ' 彩色图像的灰度化处理 For i = 0 To SourceImHeight - 1 For j = 0 To SourceImWidth - 1 PixelValue = PicSource.Point(j, i) r = PixelValue Mod 256 g = (PixelValue \ 256) Mod 256 b = PixelValue \ 65536 ' 插入图像处理的过程,对 r, g, b 进行处理 GrayValue = 0.3 * r + 0.59 * g + 0.11 * b PicDest.PSet (j, i), RGB(GrayValue, GrayValue, GrayValue) Next j Next i End Sub
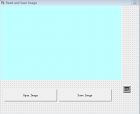
Visual Basic 与图像处理(二) 从本节开始,正式开始进入 Visual Basic 图像处理的内容,在正文中会结合一些实例来讲解 Visual Basic 处理图像的方法,当然在初始阶段,一切从简单的开始,在处理图像时也仅用 Point 与 PSet 相结合完成图像的读和写的两个过程。 1. 读入和保存图像 VB 中读入图像可以采用 LoadPicture 函数直接进行,当然也可以采用读取文件的方法直接读取图像数据,然后将图像数据在 PictureBox 中进行绘制。为了便于教学,一般都直接采用 LoadPicture 函数进行图像的读取, LoadPicture 函数的原型如下: LoadPicture ( , , , , ) as TPictureDisp 在我们读入图像时,一般直接使用下面的格式: Picture1.Picture=LoadPicture (FileName) 当 FileName 为空时,清空 PictureBox 中图像。 如果直接使用固定的 FileName 字符常量时,可读入存储器中固定位置的图像,如果希望以对话框的形式进行图像的选择性读取,可以使用 CommonDialog 控件实现。 图像保存对打开类似,可以使用写文件的形式进行图像数据的存储,在 Visual Basic 中提供了配合 PictureBox 控件专门的文件保存函数 SavePicture ,其函数原型如下: SavePicture ( Picture as TPictureDisp, FileName as String) 下面以一个实例示范如何进行图像读取和保存: 窗体中放有 1 个 PictureBox 控件用于显示图像, 2 个 CommandButton 分别用读取和保存图像, 1 个 CommodDialog 控件用于调用对话框。窗体外观如下: 注意设置 PictureBox 控件的相关属性。本例对应的相关代码如下: Option Explicit Private Sub cmdOpenImage_Click() Dim strFileName As String CommonDialog1.Filter = "bmp|*.bmp|jpg|*.jpg|gif|*.gif" ' 文件过滤,可以打开上述三类图像 CommonDialog1.ShowOpen If CommonDialog1.FileName "" Then strFileName = CommonDialog1.FileName PicShowImage.Picture = LoadPicture(strFileName) End If End Sub Private Sub cmdSaveImage_Click() Dim strFileName As String CommonDialog1.Filter = "bmp|*.bmp|jpg|*.jpg|gif|*.gif" ' 文件过滤,可以打开上述三类图像 CommonDialog1.ShowSave If CommonDialog1.FileName "" Then strFileName = CommonDialog1.FileName SavePicture PicShowImage.Picture, strFileName End If End Sub 2 、 PictureBox 控件中像素点颜色值存储格式 在 PictureBox 读入图像以后,像素点以长整型的格式存储在控件之中,利用 Point 方法可以实现像素点颜色值的读取,具体方法如下: Picture1.Point (x, y), 其中 x 为横坐标, y 为纵坐标。 在使用中常采用以下格式得到对应的值: Dim PixelValue as Long PixelValue=Picture1.Point (x, y) 为了便于后续运算,一般要完成颜色数据的分离,即将这个长整型的数转化为对应的 Red 、 Green 、 Blue 三个分量的值。在转化之前,首先看一下颜色值的存储方法,在 Visual Basic 中颜色点以下面的格式进行存储 : 其中第一个字节一般不使用,所以这里只讨论后面三个字节的分离,在数据合成时,上述三个分量分别占 1 个字节,如果将其理解为 256 进制就比如容易理解了,相当于十进制中的个位、十位和百位,只是在显示的时候还是以十进制的形式进行显示而已,如果要分离上述数据就比较简单了,只要将十进制转化为对应的 256 进制就可以了。十进制转化为二进制是除 2 取余法,转化为 256 进制也是采用同样的方法,除 256 取余即可。 下面就是作者在授课是经常采用的一种颜色数据分离方法 Dim r as Integer, g as Integer, b as Integer r = PixelValue Mod 256 g = (PixelValue \ 256) Mod 256 b = PixelValue \ 65536 3 . PictureBox 颜色点的写入 有了 Point 方法可以从 PictureBox 控件中读取颜色点值,对用还需要将某个颜色点值写入到对应的 PixtureBox 控件之中,这里采用与 Point 对用的 PSet 方法, PSet 的使用格式如下: Picture1.PSset (x, y), Color 这里的 Color 同样对应一个长整型的颜色数值,对上述数据分离对应的时,在数据处理时往往知道的是 Red, Green, Blue 三个分量的值,需要将这三个分量进行合成,得到长整型的颜色数值,合成方法与前面讲的非常类似,具体方法如下: PixelValue= r+256*g+256*b 当然在实际使用中还可以直接利用 RGB 函数进行颜色值的合成,使用方法如下: PixelValue=RGB(r, g, b) 下面结合一个实例结束这一部分内容,在完成图像读和写以后,本例中完成图像高度和宽度的自动读取,同时利用 Point 方法读取某个指定位置像素点的值,最后利用 PSet 方法将图像的左上角一块区域设置为红色。本例的运行结果如下: 对应的代码分别如下: Option Explicit Dim ImageHeight As Integer, ImageWidth As Integer Private Sub cmdOpenImage_Click() Dim strFileName As String CommonDialog1.Filter = "bmp|*.bmp|jpg|*.jpg|gif|*.gif" ' 文件过滤,可以打开上述三类图像 CommonDialog1.ShowOpen If CommonDialog1.FileName "" Then strFileName = CommonDialog1.FileName PicShowImage.Picture = LoadPicture(strFileName) End If ImageHeight = PicShowImage.Height ImageWidth = PicShowImage.Width Text1 = Str(ImageHeight) Text2 = Str(ImageWidth) End Sub Private Sub cmdPoint_Click() Dim r As Integer, g As Integer, b As Integer Dim x As Integer, y As Integer Dim pixelvalue As Long x = Val(Text3): y = Val(Text4) pixelvalue = PicShowImage.Point(x, y) r = pixelvalue Mod 256 g = (pixelvalue \ 256) Mod 256 b = pixelvalue \ 65536 Text5 = Str(r) Text6 = Str(g) Text7 = Str(b) End Sub Private Sub cmdPSet_Click() Dim i As Integer, j As Integer For i = 0 To 20 For j = 0 To 20 PicShowImage.PSet (i, j), RGB(255, 0, 0) Next j Next i End Sub
先介绍下我的机器软件配置, WIN7 64bit, Matlab R2011b 64bit, VS2010. 在论坛上找了很久,看了N多帖子. 都无法让机器上VS2010调用R2011b的函数和引擎,总是出现错误信息: Link error: can't open "libmx.lib libmat.lib libeng.lib". 结果在Mathworks 的网页上发现了如下帖子,总算成功编译通过了. http://www.mathworks.com/support/solutions/en/data/1-FWTSV5/index.html?product=MLsolution=1-FWTSV5 文章的标题是: How do I setup a Visual Studio 2010 Express Project in order to run the engdemo.cpp example in MATLAB 7.13 (R2011b) on my 64bit machine? 后来发现,需要特别注意的是这里: “Configuration Properties” - “Linker” - “Input” and add libmx.lib, libmat.lib and libeng.lib as additional dependencies. 在输入libmx.lib, libmat.lib, libeng.lib 到 Additional Dependencies 框中时候, 必须用分号(;)分隔, 就是这样: libmx.lib; libmat.lib;libeng.lib; 否则就会出现can't open "libmx.lib libmat.lib libeng.lib".的错误信息. BTW,我的VS2010 是home premieum版, MATLAB 2011b
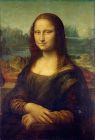
什么是神经美学? What is neuroaesthetics? Apparently it is an emerging interdisciplinary field between neuroscience and aesthetics. Although I heard the term long before, I essentially know nothing of it. This weekend there will be a conference on neuroaesthetics at UC Berkeley ( http://www.minervaberkeley.org/conferences/importance-of-being-playful ). As I am trying to determine whether or not to attend the conference, I searched the Internet to try and learn a bit more about this so-called neuroaesthetics discipline. I found that the wiki page on neuroaesthetics is a good introduction but is in English only ( http://en.wikipedia.org/wiki/Neuroesthetics ). I also found an introduction paper in Chinese, which is available as a PDF file for downloading at: http://journal.psych.ac.cn/jinzhan/qikan/manage/wenzhang/120505.pdf . If anyone interested in learning a bit more about neuroaesthetics, download it! Mona Lisa by Leonardo da Vinci: What are your brain activities when you see a painting like this?
 标签: Visual